Compose a Music Light Show with the flickerSong
flickerSong - Compose
Compose a new light show
Music light shows are composed on your Macintosh using a suitable Digital Audio Workshop (DAW) such as Apple’s Logic Pro X, Avid Pro Tools, or Ableton Live. The only requirement is that the DAW can send MIDI to a MIDI Port on the Mac MIDI Studio IAC Driver.
IAC Driver Setup

On your Macintosh, find the Audio MIDI Setup application. Open it and you’ll see the MIDI Studio Home View

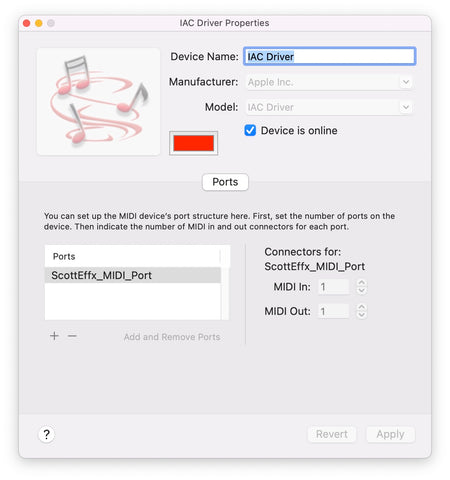
Double click on the "IAC Driver" to bring up the IAC Driver view where you can define a "Port" which will connect your Digital Audio Workshop to the ScottEffx Macintosh App

In the IAC driver, press the ‘+’ symbol in the ‘Ports’ section of the view, and create a new port named exactly ‘ScottEffx_MIDI_Port’, and give it 1 MIDI In and 1 MIDI Out connector. Press the ‘Apply’ button
Your Macintosh is now configured, all MIDI messages sent to this Port will be received by the ScottEffx Macintosh App
MIDI Out, DAW Configuration - Logic Pro X
Setting up your Software Instrument to export MIDI to the ScottEffx Application

For Logic Pro X, in top menu item Track select 'New Software Instrument Track', and you will get some default Software instrument like Electric Piano unless you’ve changed Logic Pro’s defaults.
Then, in the window presented below by Logic Pro X, select
Utility—>External Instrument—>Mono


You will then get this 'My New Track' window. Under MIDI Destination select the 'IAC Driver ScottEffx_MIDI_Port' which you previously created. Under MIDI Channel select 'All'. If the ScottEffx_MIDI_Port is not available, repeat the 'IAC Driver Setup' above.
All Done!
You can now compose MIDI into your MIDI track just like any other music composition, with each MIDI note being sent to the ScottEffx App and then on to all connected flickerSongs.
Here is the Logic Pro X ‘Tracks’ view of a light show composition with the ‘Live Loops’ grid. The music the first track, and all the following are External Instrument MIDI tracks which define the LED music Light show.


It is particularly useful to compose interesting light show effect sequences and put them into Live Loops for convenient re-use and live light show performances
Here we use the iPad Logic Remote as a Live Loops user interface during light show composition.
As long as the ScottEffx application is running and in the Compose mode, all MIDI events from Logic Pro will be expressed as light effects according to the MIDI Maps, Effects, and Output Channel assignments
Bounce Music Light Show to an MP3 file - Logic Pro X
When you have a completed a light show, you can ‘Bounce’ it to be recorded into a tag within the MP3 file. The light show and all configuration is recorded as a ID3v2 ‘Text’ tag.

The first step is to collapse all your MIDI tracks into one track which simplifies the subsequent MIDI file. Do this with a copy of your composition! In Logic Pro X select all the light show MIDI Tracks. Be sure at least one of the tracks starts precisely at the same time as the Audio which should be at 1 1 1 1.
Then under the Edit menu item select Bounce and Join—>Join.
You will want to perform this operation on a copy so you don’t lose the individual tracks for editing later. This will combine all selected MIDI tracks into one contiguous MIDI Track as shown below.

To bounce the light show you need an MP3 Audio file (the music) which must contain at least one ID3 tag. Bouncing a Light Show requires that the ID3 tag structure has already been created. The ID3 tags contain information such as ‘Title’, ‘Author’, ‘Album Art’ etc, and after we are done with the Bounce, the ID3 tags will also include all the information necessary for the light show including the MIDI file you just saved and all the light show MIDI Maps and Effects. Older versions of Logic Pro X required you to make the choice, to include ID3 tags, which is what we show next. It's possible your original MP3 music file already has tags, in which case you may be able to bounce the music light show without doing the following step.

Thus if needed you can create one in Logic Pro X, select the audio track then bounce the Audio under the top menu File—>Bounce—>Project or Section

This view will appear. Select destination MP3, check the box 'Write ID3 tags', and any other Audio file bounce options important to you. Then select ‘OK’ to save the file name and location as you want. This file will be part of your ScottEffx Music Light Show after the light show and configuration data are added below.
If the 'Write ID3 tags' box is not shown, then your version of Logic Pro X likely created them automatically, which you will know when the following steps complete successfully.

Bounce the Light Show to the MP3 file
With the MIDI Maps and Effects all correct in the ScottEffx App, select Bounce Project while in the Compose mode of the ScottEffx Macintosh App. Three popup windows will follow.

In the first window select the MP3 Audio file (must end in .mp3) you just created in the previous steps and press 'SELECT SONG'

In the second window select the MIDI file you created from Logic Pro X above (file must end in .mid) and press 'SELECT MIDI'

In the final window select the name of the file where you want to store your ScottEffx, flickerSong Music Light Show. The file will be saved with the file extension .mp3.
ScottEffx flickerSong music light show bounce completed!
You can now select the music light show and play it exactly as you composed it, using the free ScottEffx Macintosh, iPad, or iPhone app, the Mac App is shown here. Enjoy!

